Monday, September 10, 2012

How to create General Journal in AX 2012 by X++ code


With following code we can create general journal with default dimention and ledger Account
just change default values according to youe system data and simply run the job


static void Demo_CreateGLJrl(Args _args)
{
    AxLedgerJournalTable   axLedgerJournalTable ;
    AxLedgerJournalTrans   axLedgerJournalTrans;
    container            accPattern;
    container            offSetPattern;
    container            dimPattern1;
    ;
    axLedgerJournalTable = new AxLedgerJournalTable();
    axLedgerJournalTrans = new AxLedgerJournalTrans();
    dimPattern1 = [1,"Department", "000"];
    axLedgerJournalTable.parmDefaultDimension(AxdDimensionUtil::getDimensionAttributeValueSetId(dimPattern1));
    axLedgerJournalTable.parmJournalName("GenJrn");
    axLedgerJournalTable.save();
    axLedgerJournalTrans.parmJournalNum(axLedgerJournalTable.ledgerJournalTable().JournalNum);
    axLedgerJournalTrans.parmTransDate(systemDateGet());
    axLedgerJournalTrans.parmAccountType(LedgerJournalACType::Ledger);
    accPattern = ["420100", "420100", 0];
    axLedgerJournalTrans.parmLedgerDimension(AxdDimensionUtil::getLedgerAccountId(accPattern));
    offSetPattern = ["420200", "420200", 0];
    axLedgerJournalTrans.parmOffsetAccountType(LedgerJournalACType:: Ledger );
    axLedgerJournalTrans.parmOffsetLedgerDimension(AxdDimensionUtil::getLedgerAccountId( offSetPattern));
    axLedgerJournalTrans.save();
    info(strFmt("Journal %1 created with finential Dimension %2", axLedgerJournalTable.ledgerJournalTable().JournalNum,axLedgerJournalTable.ledgerJournalTable().DefaultDimension));
}

Wednesday, September 5, 2012

Generate number Sequence in AX 2012

Generate number Sequence

Suppose we want create number sequence for Test field on form in General  ledger module
Consideration: EDT-Test, Table-TestTable and Form- TestTable

Step1. Create new EDT with name Test
Step 2. Modify load module() method on  NumberSeqModuleLedger class

{
     datatype.parmDatatypeId(extendedTypeNum(Test));
     datatype.parmReferenceHelp(literalStr("Test"));
     datatype.parmWizardIsManual(NoYes::No);
     datatype.parmWizardIsChangeDownAllowed(NoYes::No);
     datatype.parmWizardIsChangeUpAllowed(NoYes::No);
     datatype.parmWizardHighest(999);
     datatype.parmSortField(30);
     datatype.addParameterType(NumberSeqParameterType::DataArea, true, false);
     this.create(datatype);
}

Step 3.Create a method on LedgerParameters Table

     client server static NumberSequenceReference numRefTest()
{
     return NumberSeqReference::findReference(extendedTypeNum(Test));
}

Step 4.Write and run following job

static void NumberSeqLoadAll(Args _args)
{
    NumberSeqApplicationModule::loadAll();

}


Step 5.Then run the wizard

Organization Administration -> CommonForms -> Numbersequences->Numbersequences-> Generate -> run the wizard.

Step 6.Now we have to check the number sequence  is correctly working  for that write a job:

static void NumSeq(Args _args)
{
    NumberSeq  numberSeq;
    Test num;
    ;
    numberSeq = NumberSeq::newGetNum(ProjParameters:: numRefTest ());
    num = numberSeq.num();
    info(num);
}


Step 7.Now we want that Number Sequence in form level(Test Table):


 Write below code in class declaration  
public class FormRun extends ObjectRun
{
    NumberSeqFormHandler numberSeqFormHandler;

}

 Step 8.Write the NumberSeqFormHandler() in form methods node.

NumberSeqFormHandler numberSeqFormHandler()
{
    if (!numberSeqFormHandler)
    {
       numberSeqFormHandler = NumberSeqFormHandler::newForm(LedgerParameters:: numRefTest ().NumberSequenceId,
                                                             element,
                                                             TestTable_DS,
                                                             fieldNum(TestTable, Test)
                                                            );
    }
    return numberSeqFormHandler;
}


Step 9.Write the  Create(),Delete(),Write() , Validate Write(),Link Active() on the Data source methods node.
 Create() Method
void create(boolean append = false,
            boolean extern = false) 
{
    element.numberSeqFormHandler().formMethodDataSourceCreatePre();

    super(append);

    if (!extern)
    {
        element.numberSeqFormHandler().formMethodDataSourceCreate(true);
    }
}

Delete() Method

public void delete()
{
    element.numberSeqFormHandler().formMethodDataSourceDelete();
    super();
}

Write()Method

public void write()
{
    super();
    element.numberSeqFormHandler().formMethodDataSourceWrite();
}


Validate Write() Method

public boolean validateWrite()
{
    boolean         ret;
    ret = super();
    ret = element.numberSeqFormHandler().formMethodDataSourceValidateWrite(ret) && ret;
    if (ret)
    {
        TestTable.validateWrite();
    }
    return ret;
}

Link Active() Method

public void linkActive()
{
    ;
    element.numberSeqFormHandler().formMethodDataSourceLinkActive();
    super();
}
Step 10.Finally add Close() method on form
void close()
{
    if (numberSeqFormHandler)
    {
        numberSeqFormHandler.formMethodClose();
    }
    super();
}

Monday, August 13, 2012

Creating Role and Policy for user in AX 2012

Task : Create a new policy for the data security(user having particular role can see only those customers which group is 20 )

Step 1. Create Query and assign its range as shown in below screen shot
Step 2. Open Security node in AOT
Step 3. Create new priviledge and add all entry point which you want to assign
Step 4. Create new duty and attach created priviledge
Step 5. Create new role and attach created duty
Step 6. Create new policy and add role and query to this as shown in below screen shot so that all user having this role can see only those customer which have gust group 20.
Step 7. Asign this policy to any user and check the credential


 Security Architecture :

Basically security node  has meny objects some are used for authorization and other for data security as shown in below screen shot


Monday, July 30, 2012

Upgrade Process in AX 2012

Upgrade Process

Following are the steps in order to upgrade AX 2009 to 2012


Preprocessing upgrade checklist
   ↓
AOD code upgrade checklist
   ↓
Model code upgrade checklist
   ↓
Data upgrade checklist
  Source System steps:
Prerequisite  Steps

1.Verify that you have the proper amount of space on your source and target system hard drive and in your database transaction log.
2. Ensure that Microsoft SQL Server is configured for the highest possible performance and throughput.
3. Clean up Data
4. Activate multisite functionality for each and every company when you upgrade from Microsoft Dynamics AX 2009 to Microsoft Dynamics AX 2012 before installing Upgrade  XPO . (For activate follow the path Administration  > Setup ->System > Multisite activation) 
5. Trade and Logistics licenses after you upgrade if configuration key enabled for source system.
6. Before you upgrade, if you are using virtual companies you must make the following changes to their configuration:  Make sure that the inventory dimensions table is not shared.  Make sure that tables that contain inventory dimension fields are not shared.
7.You will import the preprocessing XPO into the USR layer on the Microsoft Dynamics AX source system.
8. Be sure to back up your application files (*.aod) and label files (*.ald) before you import the preprocessing XPO
9. It is advisable to make sure that the Application Object Directory (AOD) is synchronized with the Microsoft Dynamics AX database schema before you begin to import of the XPO.
10.Install ALD files which are in DatabaseUpgrade\ALD path to C:\Program Files\Microsoft Dynamics AX\50\Application\Appl\Standard\ (Stop services before copy ALD file)
11.Import XPOs which  are in DatabaseUpgrade\XPO path(clear with id check box option at the time of import)
Prerequisite Steps for Target System
1.  Create a folder with name Old which is used to store AOD files in AX 2012in the folowing location %programFiles%\Microsoft DynamicsAX\60\Server\<AOSInstance Name>\bin\Application\Appl\standard
2. Copy all the AOD files in Old folder even for Microsoft Layer
3.If you have customized in folowing layer than rename with new one
      axbup.aod->axisp.aod,axbus.aod->axisv.aod,axsl3.aod->axslp.aod,axsl2.aod->axsln.aod,
axsl1.aod->axfpp.aod,axhfx.aod->axfpk.aod


Steps on Target System:

1. Open check list and path is /System Administrator/Setup/Code Upgrade check list
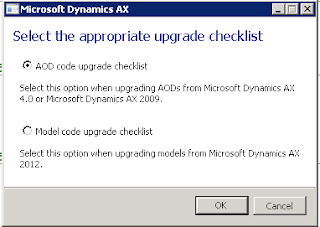


AOD code upgrade check list redio button is used for upgrade from AX 4.0 or AX 2009 to AX 2012 and Model code upgrade check list is used when source and target both are in AX 2012
2. Once click on ok it redirected to folowing check list
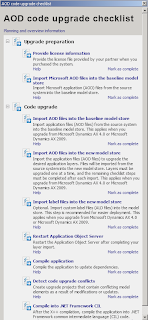


3. For compliting above check list we have to complete following steps
4. Click on Import Microsoft AOD files into the base line model store and import AOD files starting form lower layers(from SYS) to upper layer one by one
5. Click on Import AOD files into base line model store and select lowest layerfirst which you want to upgrade
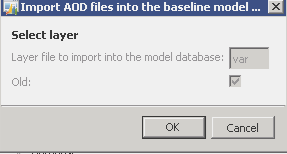

       6.Copy AOD files that you want to upgrade in the folowing location
          %ProgramFiles%\Microsoft Dynamics AX\60\Server\<AOS instance name>\bin\Application\Appl\Standard
Note:Do not copy Microsoft layers AOD in above locationand follow layer rename convention if you customized in the layer which does not exist in target system as discussed above in prerequisite for target system
7.Click on import AOD files into new model stores(make sure that model did not create already otherwise you have to delete model first then import model which you want to upgrate )
8.if you have't object in user layer then don't import user model since it hase all xpo in it .
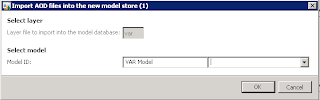


 9.Restart AOS after importing each model
10. Import label files
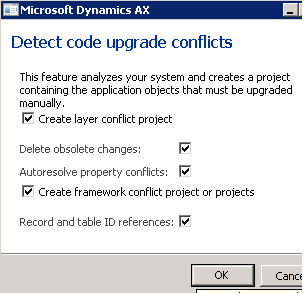
11.Click on Detect code upgrade conflicts on check list and checked check box Record and table ID referencdes as shown in folowing figure

Note: How to untall a model
 A. open command promt and navigate directory %ProgramFiles%\Microsoft Dynamics AX\60\ManagementUtilities
 B. Type  axutil delete /model:<name>
 C. Press enter
Start Preprocessing check list

You install the framework for the Preprocessing upgrade checklist in the USR layer of the Microsoft Dynamics AX source system by importing an XPO file.

To start checklist Expand Shared Project and locate Ax50PreUpgradeFramework,  Right-click it, and click Open.
and run menu item SysCheckList_PreUpgrade50

Process flow to Execute check list on source System


1.      Prepare for upgrade
Check upgrade readiness
View and fix upgrade readiness issues
Initialize preprocessing)

                 ↓
2.      Prepare application data for preprocessing

System parameters
Set up number sequence for upgrade
Company priority setup
Update country/region codes
Map country/region codes
Default country/region
Prepare financial dimension framework for upgrade
Map fixed asset calendars
Prepare currencies for upgrade
Inventory dimension group upgrade
Product upgrade (preprocessing)
Configure site structure
Map task groups to capabilities
Product Builder Route
nodes upgrade
Units
Unit conversions
Fixed units
Unit texts
About purchase order upgrade
User relations upgrade - invalid company users
User relations upgrade missing contact person
User relations upgrade duplicate user IDs
Select which employee number to upgrade

     ↓
     3. Preprocess data on live system
Run live preprocessing scripts
Country/region upgrade
Party upgrade
Run delta preprocessing scripts

                        ↓
4.      Preprocess data in single-user mode

Enter into single-user mode
Run single-user mode preprocessing scripts

Friday, July 27, 2012

How to delete transactional data in ax 2009

Some time we want to delete transactional data rather than setup and masters, for this follow the below steps::
1. Open Classes in AOT
2. Run class SysDatabaseTransDelete
3.Check the Data

but we have to setup number sequence manually.

Thursday, July 5, 2012

How to listen beep through Axapta


Try this !!!!!!!!
static void exicuteExcs(Args _args)
{
    ;
    WINAPI::beep(100000,10000);

}

How to open Executed file through Axapta

It's quite interesting to open calculator, notepad or any Executable file through Axapta try this.......

static void exicuteExcs(Args _args)
{
    ;
    WINAPI::shellExecute("cmd.exe");
    WINAPI::shellExecute("notepad.exe");
    WINAPI::shellExecute("calc.exe");
    WINAPI::shellExecute("chrome.exe",'www.axaptacorner.blogspot.com');

}

Tuesday, July 3, 2012

Import Vendors/Customers with their primary address by Template in Ax 2009
It is general issue that when we import Customer/Vendor, address tab is not updated normaly.
but following step  remove this issue, try this!!!!
1. Create template from Wizard Also select the ‘Create supporting table worksheet’ check box. This will create the lookup values for selection in the template worksheet .
2.  Number sequence is selected for the address book ID cannot be set up as continuous.
  3.  Fill mandatory  field invalid form which may be verify by lookup sheet
4.   Leave address book id blank and in address book type id set to organization
5.   Pick definition group that is created by wizard and apply import criteria
6.   In the Table Setup dialog click import criteria tab and add following code
;
vendTable.insert();// custTable.insert(); for customer
return false;//// to bypass the standard AX data import code
7. Click on compile button which is on right side
This check ur code
8. Click preview to verify the field values that are in Excel
9. Select the definition group which you created and verify file name and click on import verify file name again otherwise reselect.
10. Ignore no data imported info log it’s because we bypass the standard  code
11. Check the address button on vendor/customer and verify the data